for my supplies click HERE.
1.Open new canvas 600x600 transparent in Psp.
2.Open one tube or image, copy and paste as new layer in your new canvas.
3.Go to Selections/Select All.
4.Back to Selections/Float and again Selections/Defloat.
5.Now add a new raster layer.
6.Fill the selection with color white.
7.Go to Effects/Plugins/Alien Skin Xenofex 2/Puzzle.
8.You can play with the settings: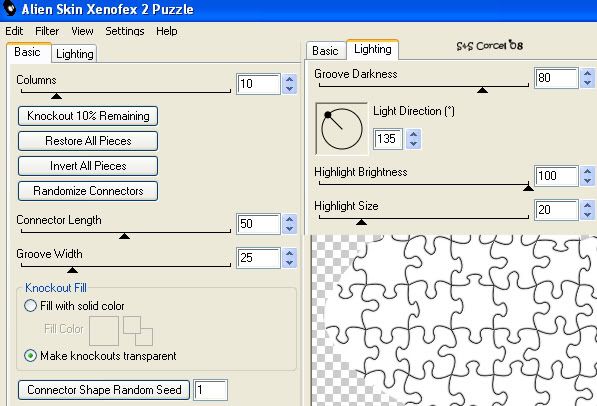 9.Hit OK, and deselect.
10.Now step in the puzzle layer, change the blend mode to Burn and low the opacity to 50%.
 11.Still in the puzzle layer, active your magic wand tool: replace mode, tolerance 20, feather 1.
 12.Select one piece from the puzzle, hit delete in your keyboard.
13.Now Step in the tube layer, place the magic wand in the middle of your selection and when your point convert to cross, move the puzzle piece out of your tube.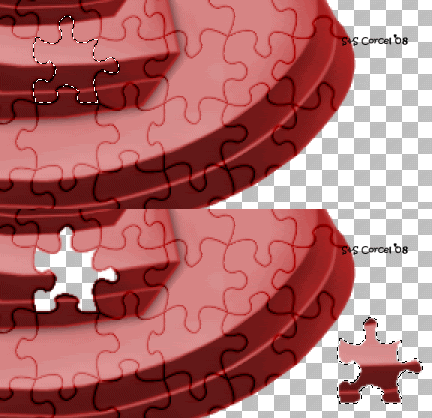 14.Apply a soft shadow [without deselect] vert-horz 0, opct 80, blur 5, color black.
 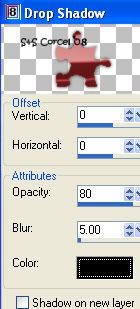 15.Deselect, and repeat the steps 11 to 14, make it with all the pieces you like.
16.When you done to separate your pieces, merge the layers visible.
17.Add a drop shadow just change the opacity to 50 and blur to 10.
18.Open another tube, copy and paste as new layer, add a drop shadow, change vert 5, horz 2.
19.Add your text/nick with a nice font, if you use a bold one, proceed to repeat the same steps to separate the pieces.
20.Merge Visible all your layers.
21.Add a new layer and fill with a light color.
22.Go to Layers/Arrange/Move Down.
23.Apply your mask, Layers/Load/Save Mask/Load Mask from Disk/Fading.
24.Now go to Layers/Merge Group, low the opacity 40%.
25.Don't forget to add your watermark and the copyright of your tube, merge layers and crop the excess of your image, export/save .jpg format.
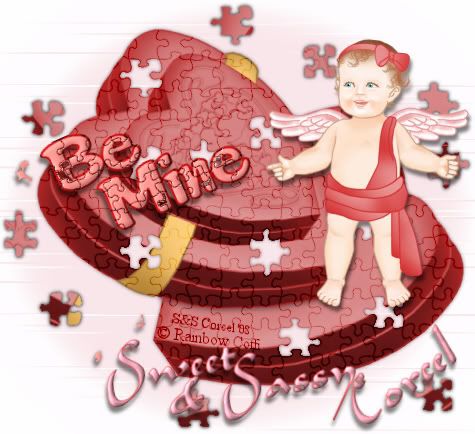
I use in this example the artwork ©Roger Gorringe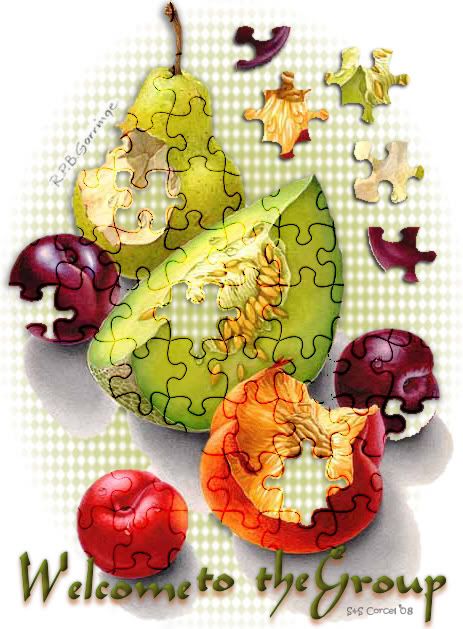 Them Done!, thanks and I hope you've enjoyed!Tutorial write on Feb. 1st '08 by AngieCorcelThis tutorial is my own creativity, any resemblance to any other is purely coincidental.
1.Open new canvas 600x600 transparent in Psp.
2.Open one tube or image, copy and paste as new layer in your new canvas.
3.Go to Selections/Select All.
4.Back to Selections/Float and again Selections/Defloat.
5.Now add a new raster layer.
6.Fill the selection with color white.
7.Go to Effects/Plugins/Alien Skin Xenofex 2/Puzzle.
8.You can play with the settings:
 9.Hit OK, and deselect.
10.Now step in the puzzle layer, change the blend mode to Burn and low the opacity to 50%.
 11.Still in the puzzle layer, active your magic wand tool: replace mode, tolerance 20, feather 1.
 12.Select one piece from the puzzle, hit delete in your keyboard.
13.Now Step in the tube layer, place the magic wand in the middle of your selection and when your point convert to cross, move the puzzle piece out of your tube.
 14.Apply a soft shadow [without deselect] vert-horz 0, opct 80, blur 5, color black.
  15.Deselect, and repeat the steps 11 to 14, make it with all the pieces you like.
16.When you done to separate your pieces, merge the layers visible.
17.Add a drop shadow just change the opacity to 50 and blur to 10.
18.Open another tube, copy and paste as new layer, add a drop shadow, change vert 5, horz 2.
19.Add your text/nick with a nice font, if you use a bold one, proceed to repeat the same steps to separate the pieces.
20.Merge Visible all your layers.
21.Add a new layer and fill with a light color.
22.Go to Layers/Arrange/Move Down.
23.Apply your mask, Layers/Load/Save Mask/Load Mask from Disk/Fading.
24.Now go to Layers/Merge Group, low the opacity 40%.
25.Don't forget to add your watermark and the copyright of your tube, merge layers and crop the excess of your image, export/save .jpg format.
I use in this example the artwork ©Roger Gorringe
 Them Done!, thanks and I hope you've enjoyed!Tutorial write on Feb. 1st '08 by AngieCorcelThis tutorial is my own creativity, any resemblance to any other is purely coincidental.
---------------------------------------------------


