
Supplies: Psp, Font or Alpha [of your choice], Preset Shape dbmpresetmiscshapes04 HERE [save this in your Psp/Preset Shapes folder, NewsPapers scraps HERE, Plugin Eye Candy 4 HERE, Tube in Black & White shade, I use artwork from ©Gennadiy Koufay.
1.Open a new canvas 500x500 transparent en psp.
2.Active your Preset Shape tool and select [dbmpresetmiscshapes04] draw your shape in the middle of your new canvas, with this settings:
2.Active your Preset Shape tool and select [dbmpresetmiscshapes04] draw your shape in the middle of your new canvas, with this settings:
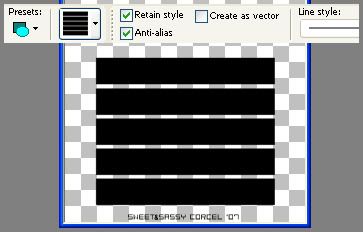
3.Rename this layer "rectangles shape".
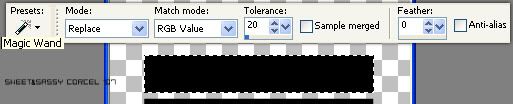
4.Active the Magic Wand tool and select one of the rectangles with this settings:
5.Go to: IMAGE/FREE ROTATE/90º/RIGHT.
6.Move the selected rectangle to the left side of your image.
7.Go to: SELECTIONS/PROMOTE SELECTION TO LAYER.
6.Move the selected rectangle to the left side of your image.
7.Go to: SELECTIONS/PROMOTE SELECTION TO LAYER.
8.Do Not Deselect yet.
9.Go to: SLECTIONS/MODIFY/CONTRACT/5 PIXELS.
10.Hit Delete in your keyboard.
11.Do Not Deselect yet.
10.Hit Delete in your keyboard.
11.Do Not Deselect yet.
12.Go to: SELECTIONS/INVERT.
13.Open your news paper scrap, I use [p129a] and go to: EDIT/COPY.
13.Open your news paper scrap, I use [p129a] and go to: EDIT/COPY.
14.Back to your canvas and go to: EDIT/PASTE AS NEW LAYER.
15.Move the piece of paper as you like in your canvas.
16.Now hit delete in your keyboard.
17.Deselect, go to: SELECTIONS/SELECT NONE.
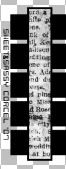
18.You should have something like this:
15.Move the piece of paper as you like in your canvas.
16.Now hit delete in your keyboard.
17.Deselect, go to: SELECTIONS/SELECT NONE.
18.You should have something like this:
19.Them with your "rectangles shape" layer active, go to: LAYERS/NEW MASK LAYER/FROM IMAGE and select the newspaper scrap:

20.Go back to: LAYERS/MERGE/MERGE GROUP.
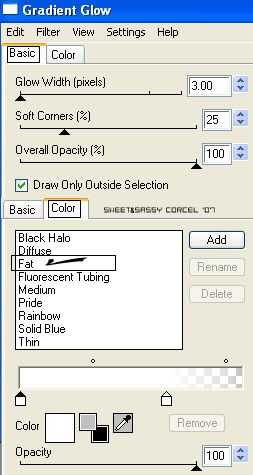
21.Go to: EFFECTS/PLUGINS/EYE CANDY 4/GLOW with this settings:
22.Now go to: EFFECTS/3D EFFECTS/DROP SHADOW with this settings: Vert & horiz 0, Opac 80, Blur 5, color black.
23.Hide this group layer for the moment.
24.Now active your layer with the piece of newspaper and merge visible with the black line layer.
25.Go to: EFFECTS/PLUGINS/EYE CANDY 4/GLOW, same settings before [step 21]
26.Go to: EFFECTS/3D EFFECTS/DROP SHADOW, same settings before [step 22]
27.Now made visibility your group layer again.
28.Then is time to add your black & white tube, copy this one and paste as new layer in your canvas.
25.Go to: EFFECTS/PLUGINS/EYE CANDY 4/GLOW, same settings before [step 21]
26.Go to: EFFECTS/3D EFFECTS/DROP SHADOW, same settings before [step 22]
27.Now made visibility your group layer again.
28.Then is time to add your black & white tube, copy this one and paste as new layer in your canvas.
29.Go to: EFFECTS/3D EFFECTS/DROP SHADOW with this settings: Vert & Horiz 0, Opac 70, Blur 10, color black.
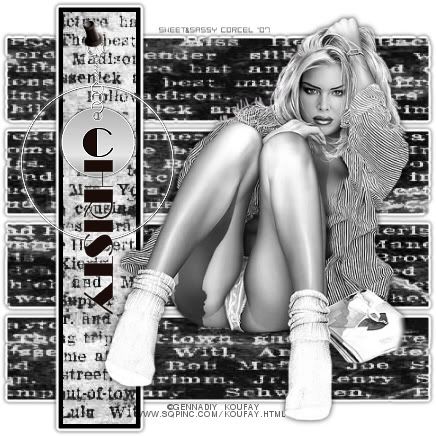
30.Finally add your nickname [you can use a regular font or any Alpha], add your watermark and don't forget the ©info of your tube.
30.Finally add your nickname [you can use a regular font or any Alpha], add your watermark and don't forget the ©info of your tube.
31.Go to: LAYERS/MERGE/MERGE VISIBLE.
32.Crop the excess of your image and Flatten all.
33.Save your work and that's all.!
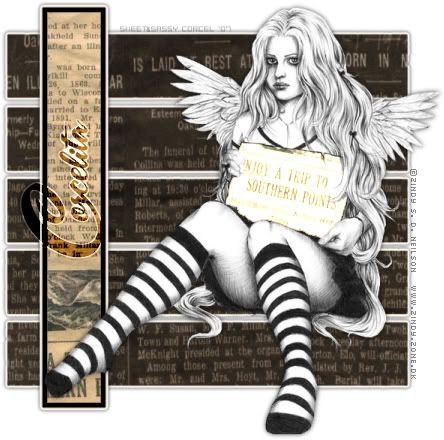
Here is another example, I use artwork from ©Zindy.
Them Done!, thanks and I hope you've enjoyed! Tutorial write on March. 18 '07 by AngieCorcel. This tutorial is my own creativity, any resemblance to any other is purely coincidentaly.
----------------------------------------------------------------


