

Supplies: Psp, Pinked ScrapKit by me HERE, Film Strip template & WordArt by me HERE, Font, 3 Images HERE, I use a Photography Courtesy Of Stock Xchng.
1.Open a new canvas 600x400 transparent in Psp.
2.Open the Pinked ScrapKit [duplicate and close the original]
3.Now select the Pinked Folded Paper or make your own fallow this steps.
4.Select one scrap paper, Edit/Copy.
5.Active your Selection tool: rectangle, feather 0.
6.Trace a rectangle in your new canvas.
7.Now go to: Edit/Paste into selection your paper.
8.Deselect.
9.Now copy the Pinked Eyelet Ribbon and paste as new layer in your canvas.
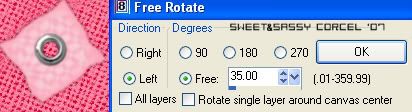
10.Rotate the eyelet 35º left [uncheck all layers] and move to the top left of your paper:
11.Now go to: Selections/Select all.
12.Back to Selections/Float.
13.Then back to: Selections/Defloat.
14.And back again to Selections/Invert.
15.Step in your paper layer [do not deselect]
16.Active the Eraser tool 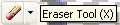 with this settings:
![]()
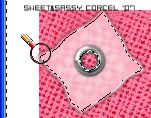
17.Erase the left top corner of your paper:
18.Deselect.
19.Now select another paper [light color] Edit/Copy.
20.Then Edit/Paste as new image.
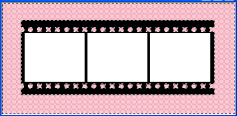
21.Open the Film Strip Template, Edit/Copy.
22.Back to Edit/Paste a new layer over your paper.
23.Go to: Selections/Select all.
24.Back to Selections/Float.
25.And back again to Selections/Invert.
26.Step in your paper layer, hit delete in your keyboard.
27.Deselect.
28.Now step in the film strip layer, active your Magic Wand tool and select inside of the 3 white squares.
29.Step in your paper layer, hit delete in your keyboard.
30.Deselect.
31.Open the 3 images you will use, copy one.
32.Select inside of 1 square with the magic wand tool and paste the image into selection and deselect.
33.Repeat this step with the other 2 images.
34.Add a Drop Shadow: vert-horz 0, opc 50, blur 5, black.
35.Copy the film strip and paste as new layer over your paper.
36.Rotate the film strip: 35º left [uncheck all layers]
37.Move this a little bit to the right side.
38.At this point you can add the embellishments as you like to decorate your tag.
39.Add the WordArt, your name, watermark and don't forget to add the ©info of your images.
40.Merge layers visibles, crop the excess of your image.
41.Flatten all, save your work.
Them Done!, thanks and I hope you've enjoyed! Tutorial write on April. 29 '07 by AngieCorcel. This tutorial is my own creativity, any resemblance to any other is purely coincidentaly.
-------------------------------------------------------------------------------------


